お久しぶりです。nemoです。
いつのまにか9月に突入してました。
それはさておき、最近、業務でConfluenceを使うことになりました。
Confluenceとは簡単に言えばWikiです。
私なんかはドキュメントを綴る際は、どれかというとPukiwikiになれているのですが、「これに乗り換えちゃおっかなー」と思いました。
が、まだどこまでどうできるのかも良くわかっていないので、使ってみようかと。(30日間無料トライアルもありますし)
今日は、環境を構築します。
Confluenceは、オンデマンド版とダウンロード版がありますが、試すのはダウンロード版(バージョン4.3.1)です。
■準備したもの
Linuxマシン(OSは32ビットCentOS 5.8)
■手順
1.Confluenceのインストール
2.データベースのインストール・セットアップ
3.Confluenceのセットアップ
1.Confluenceのインストール
Confluence自体は、MacOS用、Windows用、Linux用が用意されいますが、32ビット用Linuxのインストーラをダウンロードします。またダウンロードしたインストーラを実行するために実行権限を付与します。
[plain]
# wget http://www.atlassian.com/software/confluence/downloads/binary/atlassian-confluence-4.3-x32.bin">http://www.atlassian.com/software/confluence/downloads/binary/atlassian-confluence-4.3-x32.bin
# chmod +x atlassian-confluence-4.3-x32.bin
[/plain]
では、インストールを実行。
[plain]
# ./atlassian-confluence-4.3-x32.bin
[/plain]
以下のように幾つか問合せがありますが、取りあえずデフォルトでOK。
インストールをしますか?
[plain]
This will install Confluence 4.3 on your computer.
OK [o, Enter], Cancel [c]
[/plain]
インストール方法を指定。
[plain]
Choose the appropriate installation or upgrade option.
Please choose one of the following:
Express Install (uses default settings) [1], Custom Install (recommended for advanced users) [2, Enter], Upgrade an existing Confluence installation [3]
[/plain]
インストール先を指定。
[plain]
Where should Confluence 4.3 be installed?
[/opt/atlassian/confluence]
[/plain]
データ配置先を指定。
[plain]
Default location for Confluence data
[/var/atlassian/application-data/confluence]
[/plain]
利用するポート番号を指定。
[plain]
Configure which ports Confluence will use.
Confluence requires two TCP ports that are not being used by any other
applications on this machine. The HTTP port is where you will access
Confluence through your browser. The Control port is used to Startup and
Shutdown Confluence.
Use default ports (HTTP: 8090, Control: 8000) - Recommended [1, Enter], Set custom value for HTTP and Control ports [2]
[/plain]
サービスに登録するかを指定。
[plain]
Confluence can be run in the background.
You may choose to run Confluence as a service, which means it will start
automatically whenever the computer restarts.
Install Confluence as Service?
Yes [y, Enter], No [n]
[/plain]
最後に次のメッセージが表示されればインストール完了です。
[plain]
…(略)
Confluence 4.3 can be accessed at http://localhost:8090
Finishing installation ...
[/plain]
では、Confluenceを起動してください。
[plain]
# /etc/init.d/confluence start
[/plain]
コンフルエンスのインストールはこれで完了です。
[http://<confluence server>:8090/]にアクセスしてみてください。
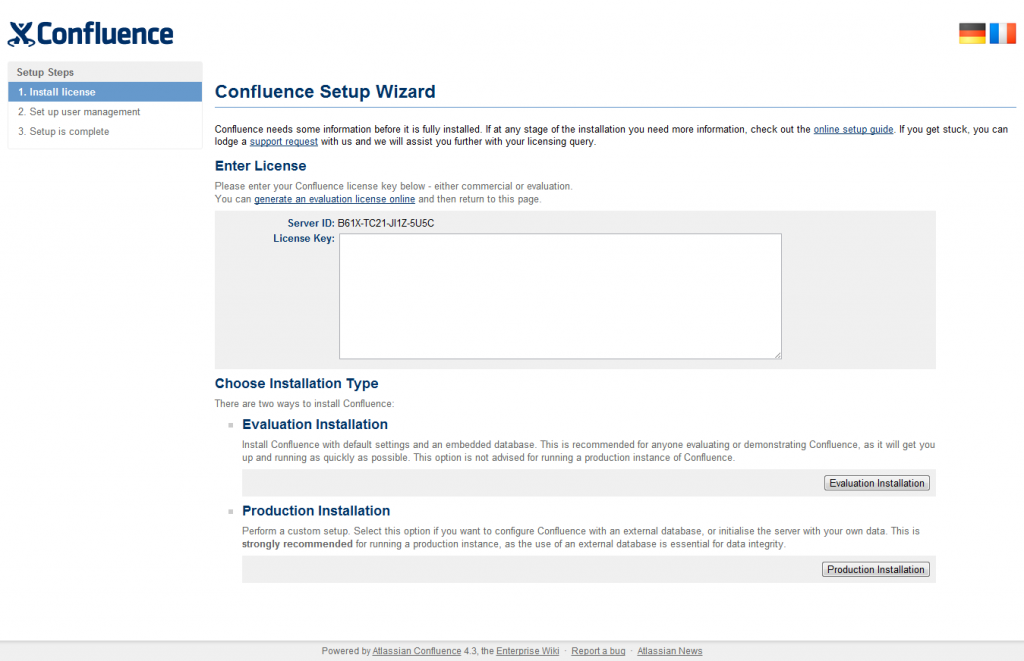
が表示されれば成功です。
2.データベースのインストール・セットアップ
次にデータベースのインストールですが、[yum install postgresql]でさくっと入れようと思ったらCentOS 5.8のデフォルトリポジトリから取得できるpostgresqlは8.1でした。
[plain]
======================================================================================================
Package                     Arch             Version                       Repository           Size
======================================================================================================
Installing:
postgresql                  i386             8.1.23-6.el5_8                updates             2.9 M
Installing for dependencies:
postgresql-libs             i386             8.1.23-6.el5_8                updates             197 k
Transaction Summary
======================================================================================================
[/plain]
ただ、Confluenceのサポートしているpostgresqlは8.3/8.4/9.0ってことなので[https://confluence.atlassian.com/display/DOC/Supported+Platforms]、今回は32ビットCentOS 5のpostgresql9.0のリポジトリを追加します。
[plain]
# wget http://yum.pgrpms.org/9.0/redhat/rhel-5-i386/pgdg-centos90-9.0-5.noarch.rpm">http://yum.pgrpms.org/9.0/redhat/rhel-5-i386/pgdg-centos90-9.0-5.noarch.rpm
# rpm -ivh pgdg-centos90-9.0-5.noarch.rpm
[/plain]
リポジトリを追加したのでpostgresql9.0がインストールできるをことを確認。
[plain]
# yum search postgresql
[/plain]
確認できましたら、インストール。
[plain]
# yum install postgresql90-server
[/plain]
インストールが完了したらデータベースクラスを作成
[plain]
# /etc/init.d/postgresql-9.0 initdb
Initializing database:                                     [  OK  ]
[/plain]
データベースを起動
[plain]
# /etc/init.d/postgresql-9.0 start
Starting postgresql-9.0 service:                           [  OK  ]
[/plain]
postgresユーザーにユーザーを変更し、コンフレンス用のデータベースを作成
[plain]
# su - postgres

$ psql
psql (9.0.9)
Type "help" for help.
[/plain]
ユーザーを作成(ユーザー「confluence_db_user」/パスワード「xxxxx」として作成)
[plain]
postgres=# create role confluence_db_user PASSWORD 'xxxxx' CREATEDB LOGIN;
CREATE ROLE
[/plain]
データベースを作成(データベース名「confluence_db」として作成)
[plain]
postgres=# create database confluence_db owner confluence_db_user template=template0 encoding='utf-8';
CREATE DATABASE
[/plain]
これでデータベースの設定は完了です。
3.Confluenceのセットアップ
では最後にconfluenceのセットアップです。
[http://<confluence server>:8090/]にアクセスし、confluenceの初期画面を表示。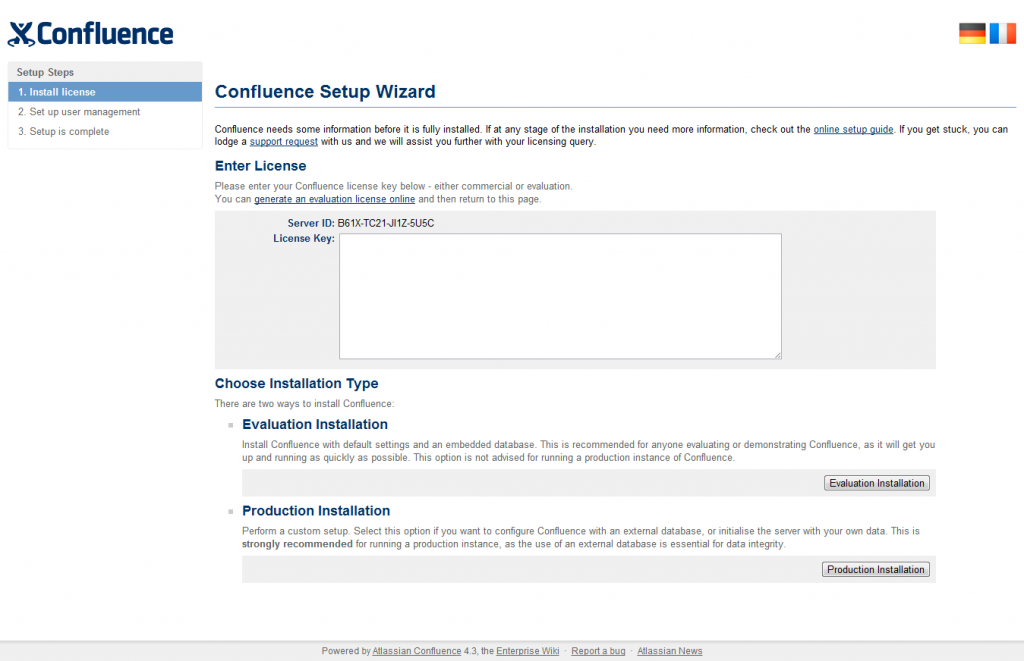
[Enter License]の[generate an evaluation license online]をクリックし、ユーザー登録を行ってください。
ライセンスを発行する際、サーバーIDを求められます。サーバーIDは初期画面の[Server ID]になります。
ライセンスが発行されたら、License Keyに入力し、[Production Installation]をクリック。
次にデータベースを設定します。
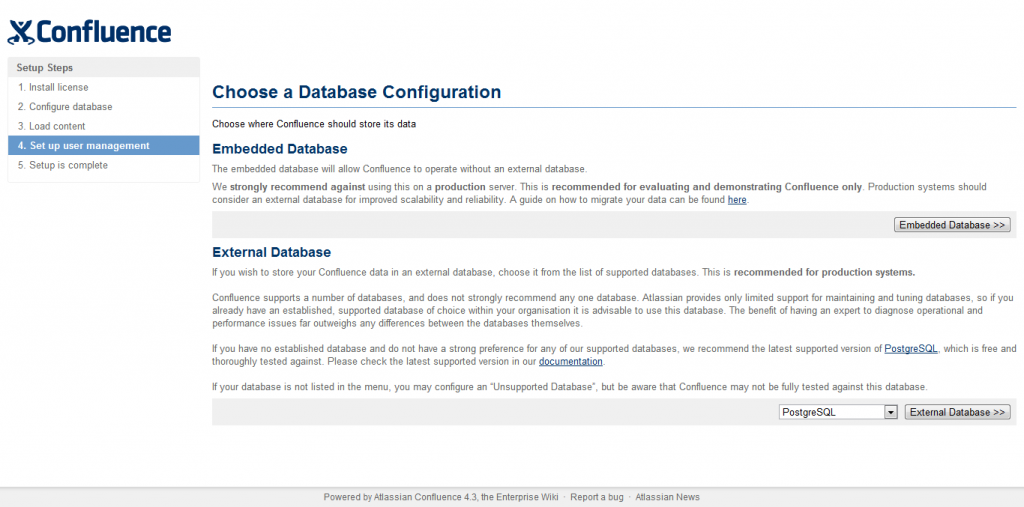
今回は2.でPostgresqlをインストールしているので、External Databaseで[PostgreSQL]を選択し[External Database>>]をクリック。
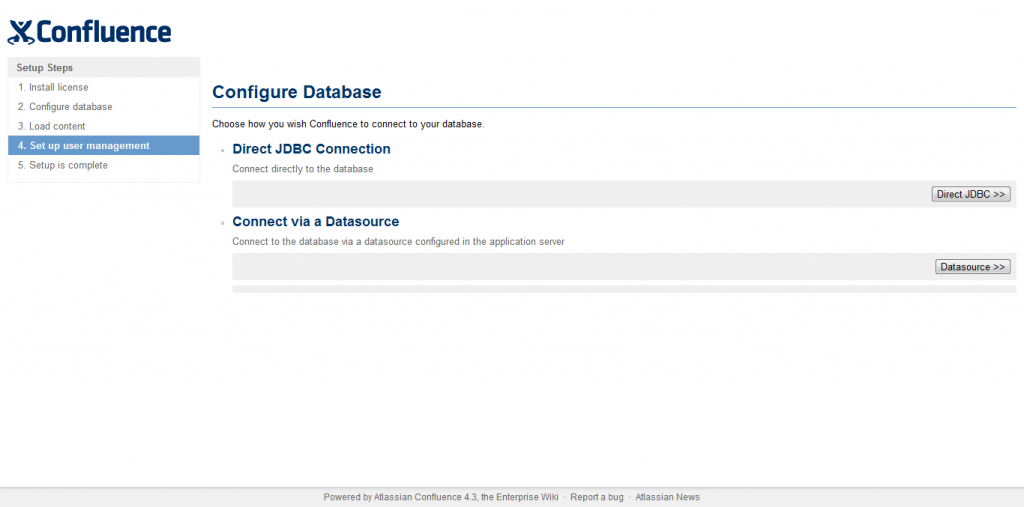
接続方法は[Direct JDBC>>]をクリック。
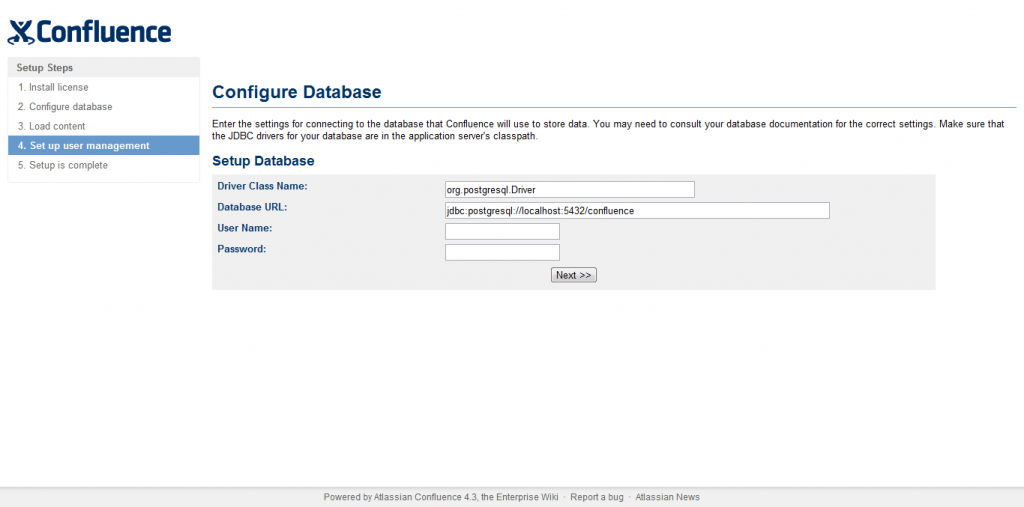
接続先の設定は、先ほど設定したデータベースに従います。今回の場合の設定は下記になります。
| Database URL: | jdbc:postgresql://localhost:5432/confluence_db |
| User Name: | confluence_db_user |
| Password: | xxxxx |
入力が完了したら、[Next>>]をクリック。
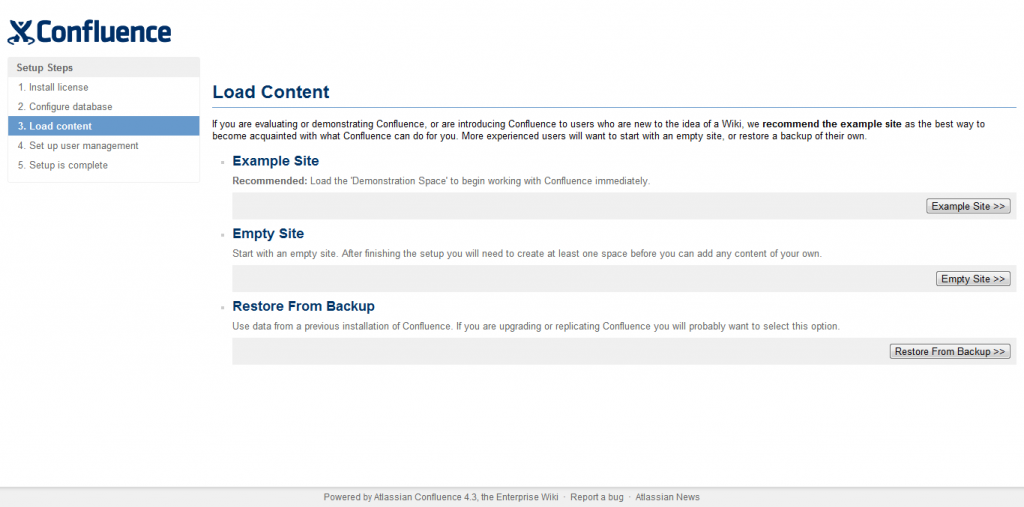
次に、コンフルエンスの初期コンテンツを決めます。サンプルも選べますが、今回は空のサイトを構築します。
[Empty Site>>]をクリック。(Restore From Backupはバックアップからのリストアになります。また別の機会に)最後に管理者設定です。
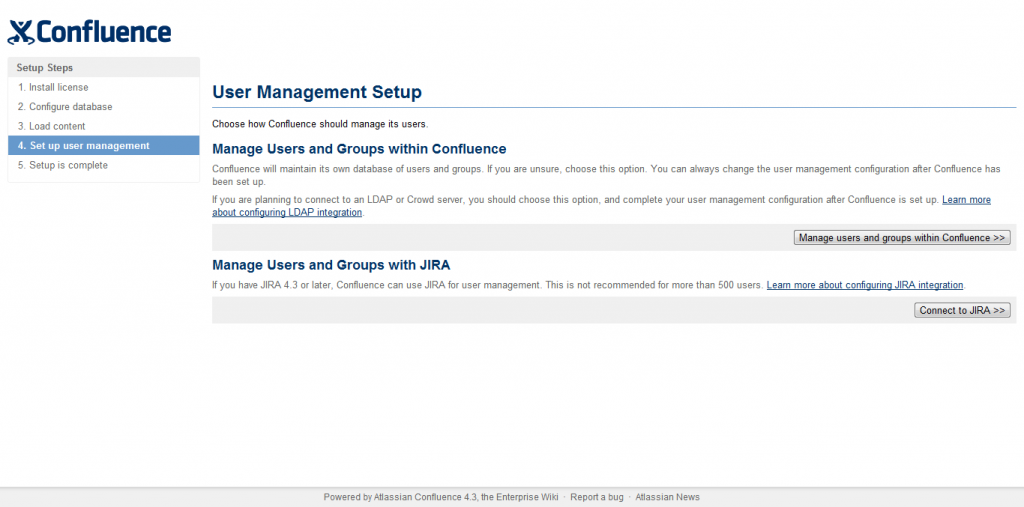
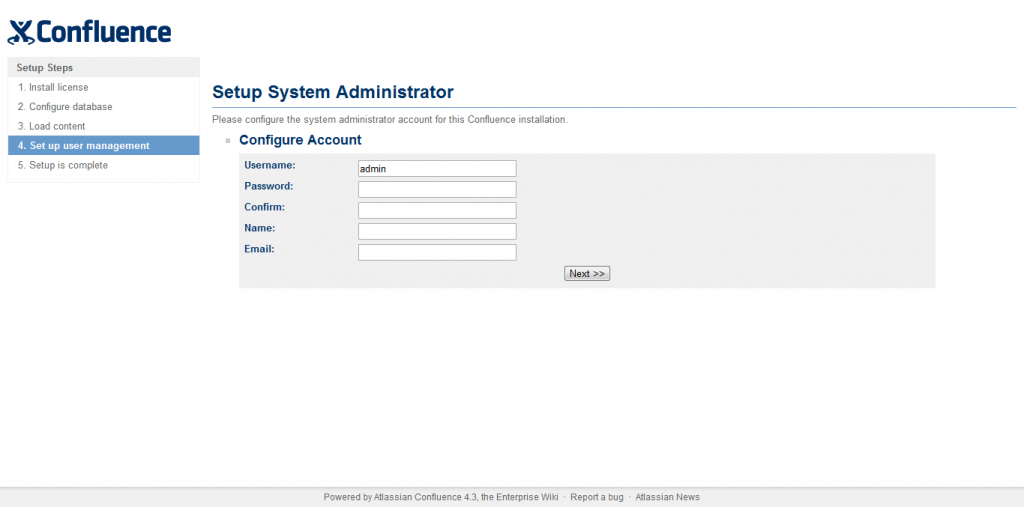
管理者のUsername(ログイン時のユーザーID)・Password(ログインパスワード)・Confirm(Passwordに同じ)・Name(表示名)・Email(メールアドレス)を指定し[Next>>]ボタンをクリック。
お疲れ様です。[Start using Confluence]リンクをクリック。
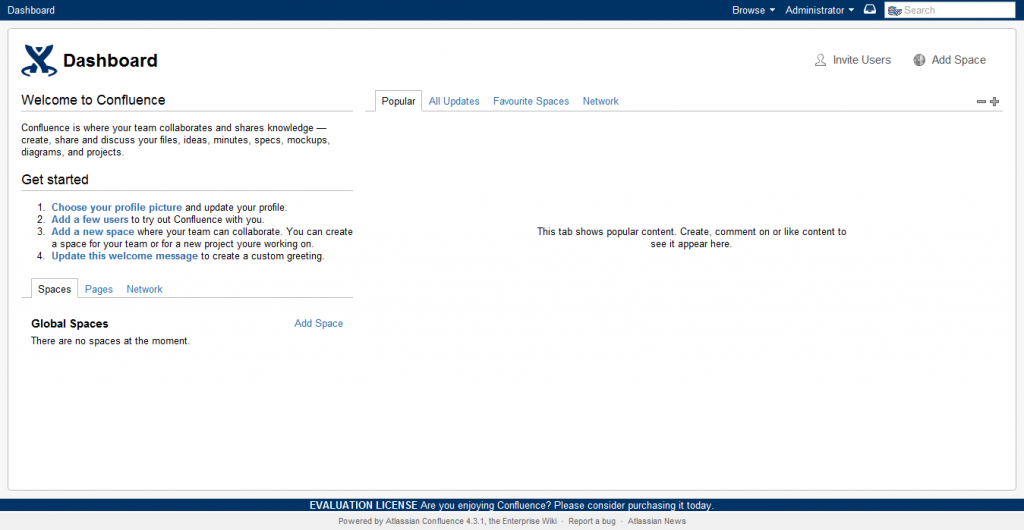
下記の画面が表示されconfluenceのセットアップ完了です。
次回からは、Confluenceの設定などの、いじったことなど書ければと思いますので。
ではまた。


